
Do-it-yourself mouse is a stunning symbol for the New Year with real instructions
To make a New Year symbol (mouse) with your own hands, you need to have a lot of patience and clear step-by-step instructions. It is with such algorithms that the editors of homemaster.techinfus.com/en/ will introduce you today. After all, preparation for the main celebration requires thoroughness and responsibility, especially if you are an avid hostess in the house.

The finished character can be not only a home decoration, but also an accessory with keys
PHOTO: youtube.com
The content of the article [Hide]
How to crochet a mouse
For those who are proficient in knitting, crochet mouse patterns may be suitable. Typically, a legend is assigned to each individual part. Therefore, after that, several ready-made fragments will have to be combined into one whole animal.
A small animal can be made with different hooks. It all depends on how much of the product will be the desired result
PHOTO: 2020-god.com
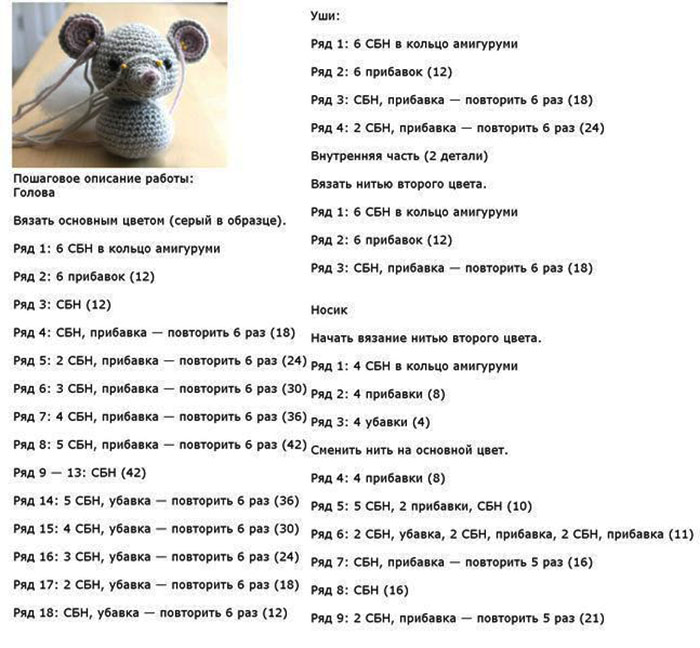
Crochet mouse: a diagram with a step-by-step description
In order to make an unusual, slightly childish toy, some tools and a drawing will come in handy, in which the numbers and names of the loops that follow each other are clearly visible.

The festive model of a girl mouse will play the role of a Christmas tree toy or decoration of a children's room
PHOTO: pinterest.com
So, to execute such a character, the following tools are required:
Please note that there should be plenty of yarn. Estimate the number of knitting threads by eye, and be sure to take care of some margin. You may wish to deviate somewhat from the scheme, do it wisely if you have good experience in crocheting. The outer part of the toy can be brushed a little. The result is a fluffy mouse.
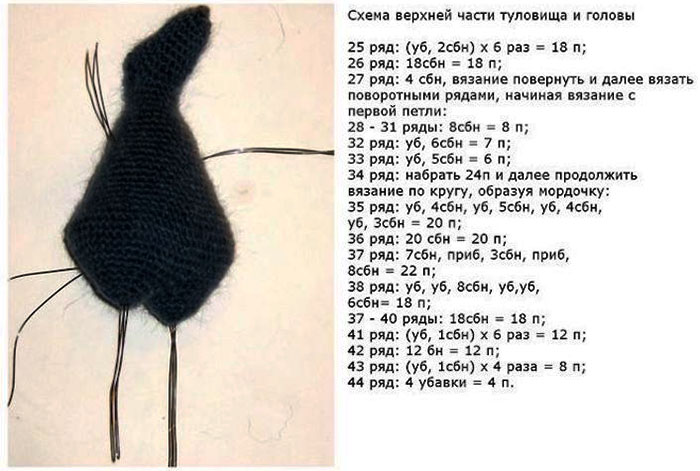
Crochet mouse: diagrams of body parts step by step
Knitting can consist of a few simple pieces, often requiring separate creation of the upper torso and head.
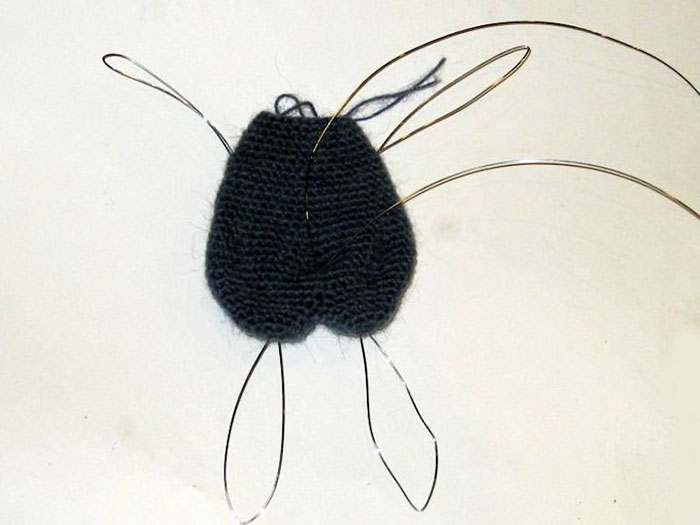
The result should be the same as in this photo.
PHOTO: 2020god.su
The knitting process is as follows.
- It all starts with the preparation of the thigh, from which a thin slender leg will already go. You will need two of them. It is better to initially make them suction, so that there are fewer details for stitching. At the same time, make sure that the product is symmetrical. To do this, use a guide marker or contrasting thread.
- The first row is performed in 6 single crochets in the amigurumi ring. In the next row, 6 increments are provided, respectively, 12 loops should be obtained. In the third row, there is another increase of six single crochets. The result is 18 loops.
- When designing the fourth, fifth and sixth rows, 18 single crochets are performed for each. As a result, we get 28 loops. Next, you need to sew both parts together so that they form two combined cone-shaped hills.
- Now knitting with a spiral continues, where in the first row one single crochet is performed 14 times. In the second, make 6 single crochet, repeat this action six times. Next, knit seven sc (single crochet) and again increase by 6.
- In the fourth row of the same columns, 8 are performed, they, in turn, are knitted 5 times. As a result, the last increase is 7 single crochet. The last loop in this row is not tied.
- On the fifth row, two air loops are knitted, then two base loops are skipped, then 61 single crochets follow. This is done in order to form the correct hole for the tail.
- The sixth and seventh rows are repeated: 60 RLS are performed. In the eighth and ninth rows, a decrease is made six times. The tenth has 48 single crochets. In the 11th row, decrease again, six single crochet 6 times. From row 12 to 15, 42 single crochets are performed.
- On the sixteenth row, subtract six single crochets six times. In 178-18 there are 36 single crochets. In the 19th row, a decrease of 4 PRs is performed 6 times. In row 20, you need to make 7 sc and 1 air loop. Next, one loop of the base is skipped. Then 14 sc, 1 air. Skip one loop of the base again. Now 7 sc in order to form the holes for the legs of the animal.
- For rows 21 and 22, 30 single crochet are performed, then they are reduced by 3 six times. In row 24, 24 single crochet are knitted.
Now all that remains is to make a wire frame to form the more rigid parts of the mouse. Next, knit the remaining rows as shown in the diagram above. As a filler, synthetic winterizer, ordinary cotton wool, herbs or chopped straw can be used.
The paws and tail of the mouse are tied with pink smooth yarn. These details should stand out well against the background of the torso.
PHOTO: daimand.ru
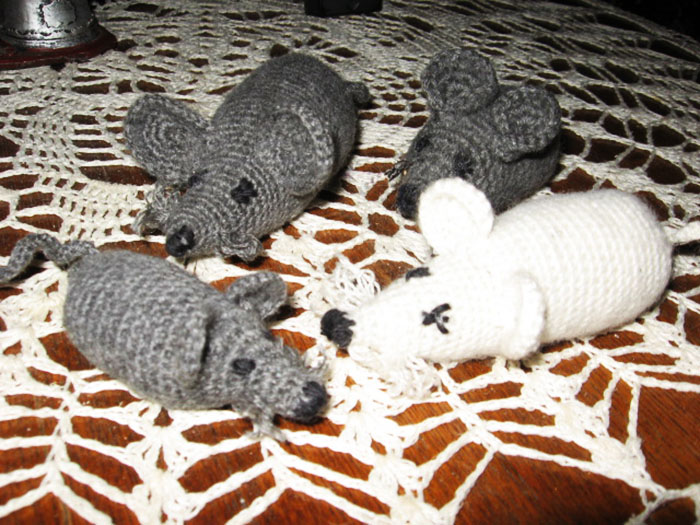
It is better for any knitted rat or mouse to make eyes and a nose from threads. They will not come off or get lost. If you use beads, you can also fix them with a thread.
PHOTO: liveinternet.ru
How to make a paper mouse: three interesting options
Origami technique familiar to everyone. Even a child who is good at logical thinking is able to cope with such a product. In addition, interesting applications are often created, unique New Year characters with a voluminous body. Let's consider each instruction in more detail.
The original face will be a bright addition to any craft. Make sure the curves are correct for a similar figure
PHOTO: vnitkah.ru

Origami animals can be made from colored paper by drawing their muzzle with felt-tip pens
PHOTO: megamaster.info
Origami paper mouse
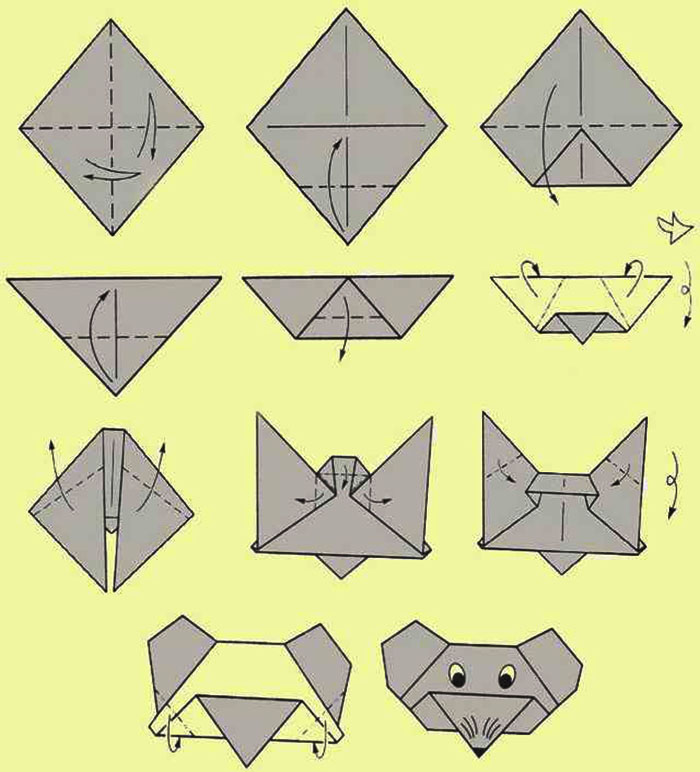
Despite the clear geometry of paper figures, the main symbol of the New Year 2020 will certainly be recognizable. To make a little mouse's face, be sure to follow the steps on the diagram.If you plan to fold the mouse together with the body, pay attention to the photo instructions below.
| Illustration | Action Description |
|---|---|
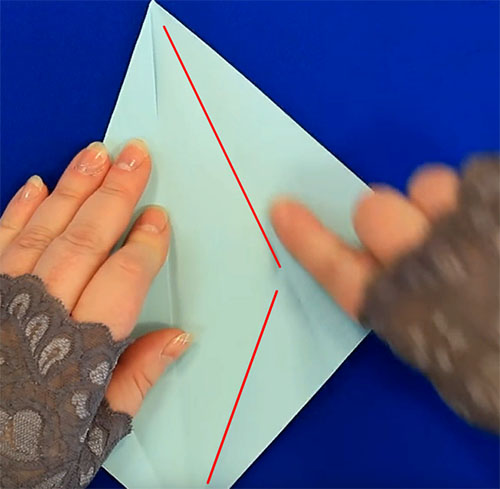
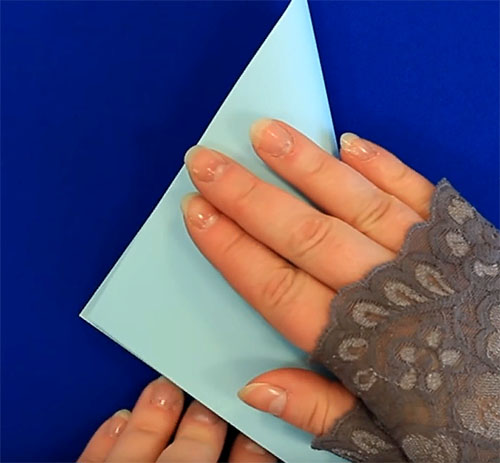 | Prepare a square sheet of blue or blue paper and fold it diagonally |
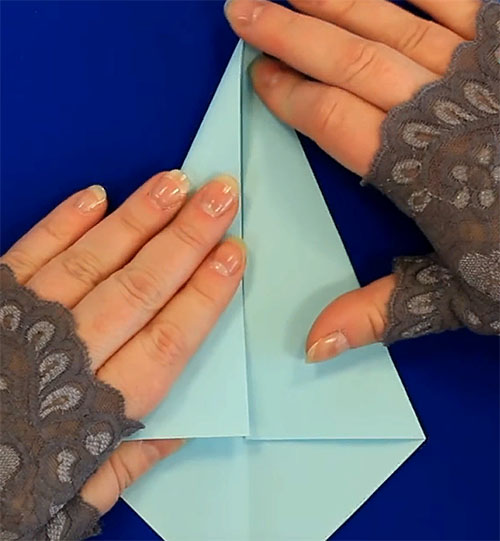 | Expand the square and bend its edges to the middle so that a triangular fragment remains below |
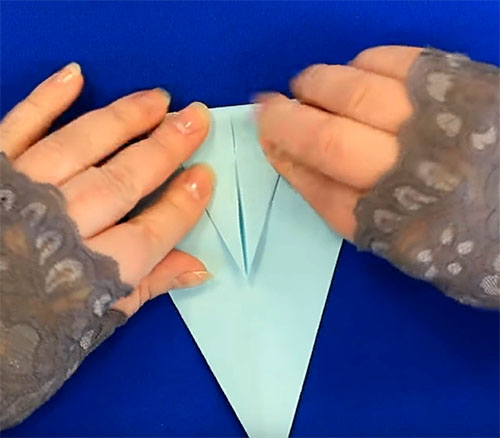
 | In the same way, we perform the folds of the lower part, capturing the already bent side. Keep lines and corners sharp |
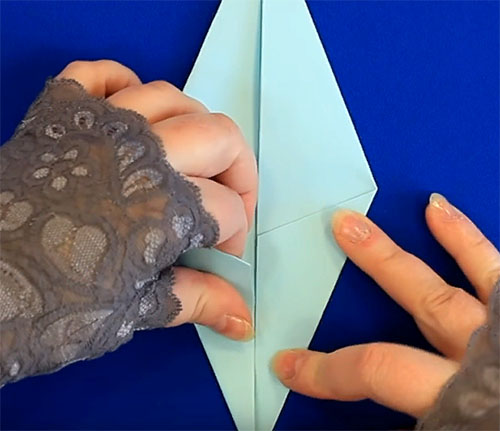
 | We unfold the paper and fold it along the lines indicated in the photo. As a result, a sharp volumetric corner should be obtained from above. We do a similar work on the other side. |
 | Now bend the right corner to the fold line. In the same way, we make a bend of the triangle on the opposite side. Next, bend both triangles to the top. |
 | We turn the workpiece over, then we fold the upper corner so that it goes just below the center line of the bend |
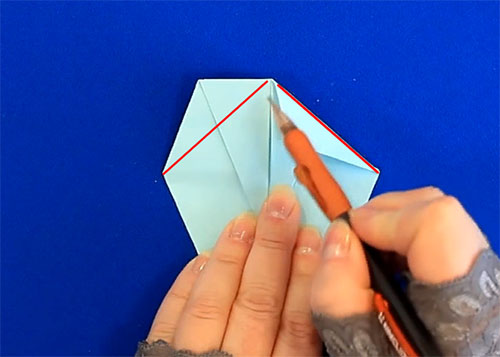 | We fold the upper parts of the workpiece focusing on the red line |
 | Now we fold the craft in half, turn the emerging triangles outward, and open the pockets inside them to get the volume |
The ponytail can be made of the same paper by bending it inward at the rear edge, or glue a separate one by cutting it out of the material of the same color. It remains only to draw the muzzle to the mouse.
Related article:

How to make a volumetric mouse out of colored paper: video
You can make a do-it-yourself mouse from colored paper... This will require different colors of material and a small amount of cardboard. Instead, you can use the leftover paper towel or toilet paper roll. For details on how to make such an animal, see the video.

Paper application with a mouse for school
Before the New Year's holidays, school often requires crafts for a competition or just to decorate the class. To make a suitable model, you can use a special template or make the animal yourself.

Simple applique for a New Year card
PHOTO: culture.ru
To complete the mouse, you need the following material:
We will perform the application as follows.
- Let's prepare for a start all the details of the animal: body, muzzle, nose and ears.
- Cut out a circle and a heart from blue paper (choose the diameter and size yourself.
- We make two small circles from a white sheet, and one from black paper. We also cut out six long and narrow ribbons from a dark color. Take the pink paper and cut out two more circles, slightly larger.
- Cut a strip 7-8 cm long and 4-5 mm wide from blue paper.
- Let's start assembling the animal. To do this, we make a low cone from the circle. To do this, cut off a small corner from the middle, then glue the two edges together.
- Glue the heart to the junction with glue stick. This will be the muzzle. We wait until the figure dries up.
- Then we glue narrow strips of dark color closer to the edge of the muzzle, on top we attach a dark circle. You will get a mouse nose.
- White circles are glued for the peephole. Inside them, draw the pupils of the animal with a marker or felt-tip pen.
- We make the ears in the upper part of our muzzle, for this we glue the yellow circles to the blue paper.
- It remains only to glue the tail inside the calf.
Such a mouse can then be glued to a children's greeting card or made part of a large applique.
Related article:

You can make several of such mice and dilute the composition with plasticine cheese.
PHOTO: mycrafts.ru
We make a mouse from plasticine step by step
It's very easy to make a New Year's mouse with your own hands using plasticine... Wax or regular material is suitable for this job.
What is required for work
Take plasticine in three colors: beige or pink, white and brown, a cutting knife and a board to work with. Now you can start the step-by-step execution of the craft.
| Illustration | Action Description |
|---|---|
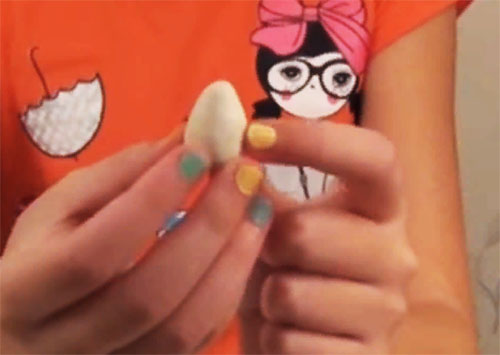 | Take a small piece of white plasticine and form a ball out of it. Then convert to pear shape. |
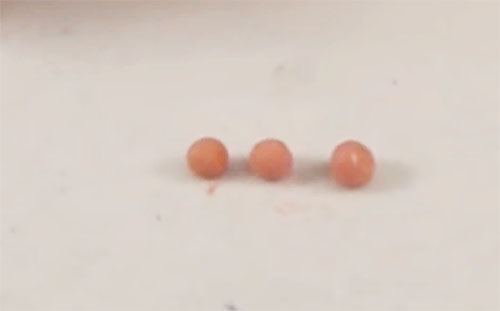 | We make three small balls from pink plasticine - these will be ears and a nose. |
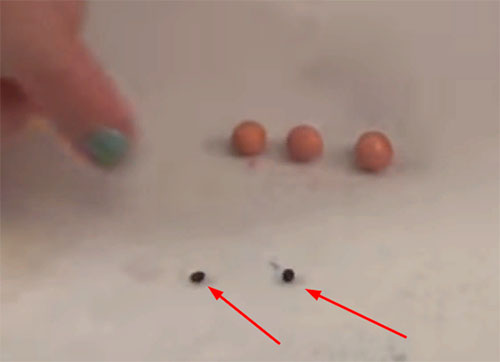 | Make two miniature balls of black plasticine, they will be for the mouse's eye. |
 | We make three more pink balls. They should be slightly larger. |
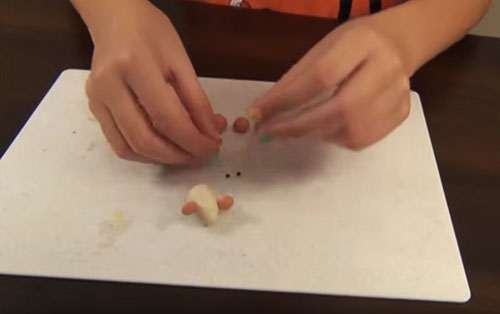 | Now we start assembling the calf. We take the body of the mouse and two pink balls, slightly flatten them and fasten them in the places where the ears should be. We make a nose and legs, from the remaining ball we make a flagellum, it will serve as a tail for the mouse. |
Diy edible crafts of the symbol of the New Year 2020
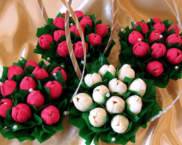
To decorate the New Year's table, hostesses try to use thematic items for this purpose. Why not make a symbol of the new year from products in this case. We offer several interesting options based on the results of the selection of homemaster.techinfus.com/en/.
You can use metal ponytail skewers. Then it is convenient to take cookies for them
PHOTO: heaclub.ru
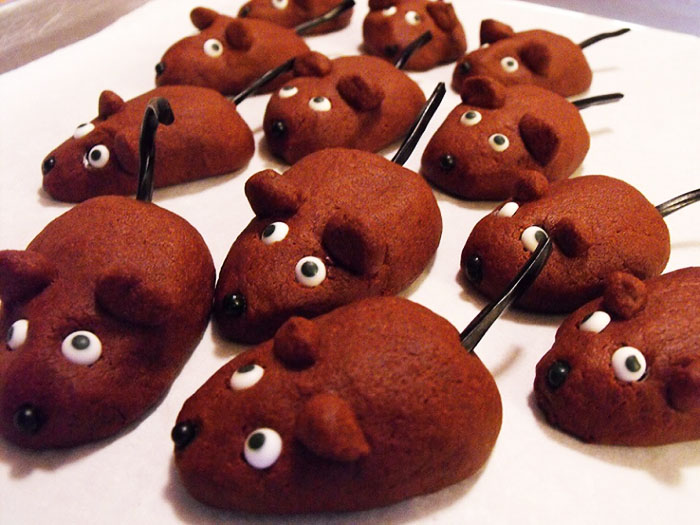
Mouse-shaped pastries
Mice from homemade biscuit will turn out to be miniature and very original. Shape the dough into shapes and bake at 180 degrees for 25-35 minutes. After the product has cooled, make ponytails and eyes from the whipped cream.

Mouse tails can be made from the same dough
PHOTO: liveinternet.ru
Shortcrust dough mice with peanuts instead of ears are very ruddy and crispy. After the baking has cooled, be sure to make eyes. To do this, drop one drop of hot chocolate into the desired places.
How to mold a fudge mouse
Fondant and mastic are used to decorate cakes and pastries. For the New Year, you can prepare a lot of different muffins and sweet pies. As a result, they are easy to add with a sticky food product. Look at the photo for one of the options for decorating sweets.
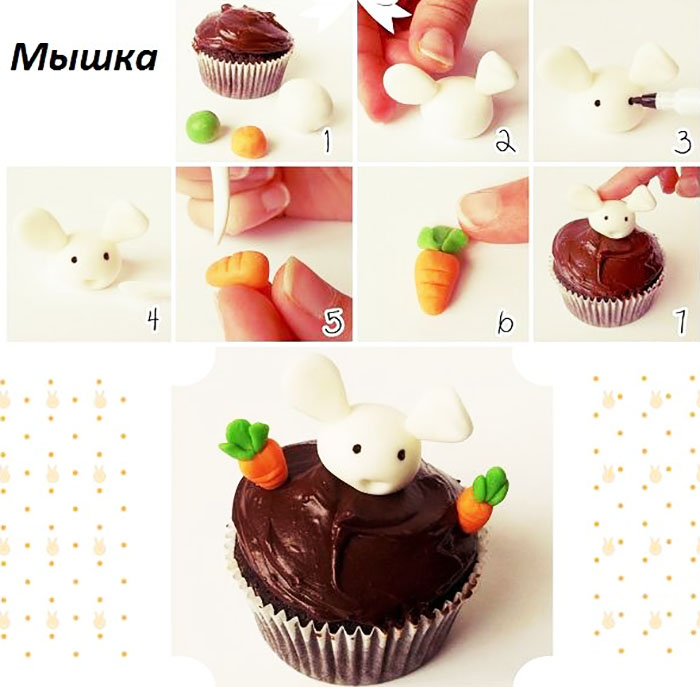
In order for the animal to retain its shape on the product longer, it can be frozen after manufacturing
PHOTO: tridevici.com
Make culinary masterpieces and decorate the room with different craft patterns. It is very easy to make a mouse from scrap materials, if you do not miss the nuances of step-by-step instructions. With this decor, a festive mood will be provided. Dear readers of our online magazine, suggest your ideas for creating characters. Perhaps you have personal photos of master classes in your arsenal, we will be glad to see.

See also:
 Bright fairy tale with your own hands - corrugated paper flowers
  Self-adhesive furniture film - the ideal solution for inexpensive interior renovation
  Art that is available to everyone - decorating the Christmas tree and not only with the help of Christmas balls with your own hands
  🐖 And let's lure good luck into the house in 2019? The do-it-yourself symbol of the new year (pig) will help us with this.
  🎄 We give bright emotions along with an unforgettable handmade New Year's bouquet
  A soft and fluffy do-it-yourself pom-pom rug - a cozy miracle in the house


